Make Your Own Knitting Loom
Quick Links
- Archived - Ask a Knitting Question
- Basic Knitting Stitches
- Beginner Knitting Patterns
- Knitting Abbreviations
- Needle Sizes Chart
- Tension Squares
- Yarn Comparison Chart
FYI: This site receives a small amount in commissions from affiliate links and third-party advertising.
Would you like some instructions on how to make your own knitting loom?
It is not that difficult, you will need a few tools (power tools, if you are short on elbow grease like me) and of course, some instructions, but it is very do-able!
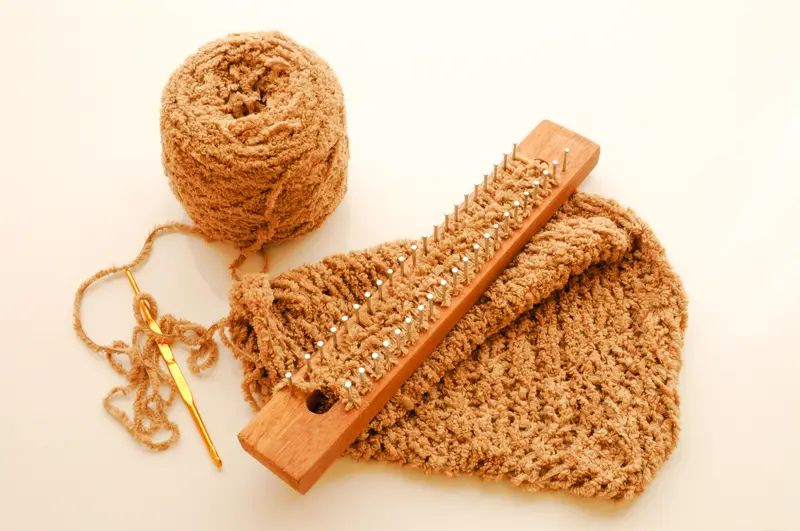
© Xiebiyun | Dreamstime.com - Long Knitting Board
Everything You Need to Make Your Own Knitting Loom
Materials:
- A Piece of Timber - the length will depend on the size of loom you want to make
- A quantity of 1¼ inch long finishing nails
- 2 x ¼ bolts - approximately 2.5 - 3 inches long
- Washers and Wing Nuts to fit the bolts
Tools:
- A saw (to cut the wood)
- An electric sander or sand paper
- An electric drill or a drill press (a press is more precise) and
- a hammer
Finishing
To finish your loom you can use a stain or varnish, either of which can be found at your local hardware or paint store.
Ready to Get Started?
The timber I used to make my knitting loom was a piece of dressed pine that I purchased from the local hardware store with the following dimensions: 40mm x 19mm x 1800mm. I bought a piece 1.8 metres long because I intended to make several looms, but you can generally get smaller pieces.
You can buy raw pine (or any other type of timber for that matter) to use to make your loom, it is much cheaper than dressed timber, but you will have to do a lot more work to smooth off the surfaces.
Cutting Your Timber
The first step if you want to make your own knitting loom is to measure out your pieces and mark the timber where the cuts need to be made. It is an old adage but still apt - measure twice, and cut once!
To make your own knitting loom or board, you need six pieces, two side boards and four spacers.
The two side pieces are the long strips of timber that function as needle beds. If you buy a knitting loom, you will find that they come in standard sizes but as you are making your own you get to decide how long you want it to be!
For my loom, I cut two pieces 72.5cm (or 725mm) long.
Spacers are small blocks of timber which fit between your main needle beds creating a gap that your knitted fabric goes through. You should make four, but more often than not you will only use two at a time.
To work out how big to make the spacers measure the width of your timber and cut the length to match. Mine was 40mm wide, so I measured out 4 40mm blocks from the edge of the piece of timber.
So in total, I used approximately 1610mm of my 1800mm piece of pine.
Time to Drill!
The next step is to drill the holes for the bolts that hold your knitting loom together, and the placement of those holes will depend on the size of your spacers. The holes need to be large enough for your ¼ bolts to go through and they should pass through the centre of the spacers.
As my spacers are 40mm wide, I measured 40 mm from each end of the two side pieces and drew a line across the timber. I then drew a diagonal line from each corner to the opposite edge to meet the 40mm mark to identify the centre point.
As soon as you have your pieces marked you can drill a hole in each piece using a ¼ inch drill bit.
Sanding and Staining
Some people will tell you that the sanding and staining is the final step if you make your own knitting loom, but I prefer to do it before I place the needle bed on the side pieces. Getting a pice of sand paper between the nail is a bit of a pain!
Basically what you need to do is round the edges on each of your timber pieces and smooth off all of the surfaces. It doesn't take long if you use an electric hand sander and the finish is rather good.
If you want to stain or varnish your loom, now is the time to do that as well.
Setting Up the Needle Bed
The next step is to find and mark the center of both of your side pieces. Then working your way towards each end - begin marking every ¼ inch (approx 6.5mm) until you are around 10mm away from the edge of the spacer. These marks are where you will be placing the nails.
Actually placing the nails is a bit easier if you pre-drill a starter hole for each nail. To do that you should use a drill bit the same diameter as the nails, and the holes should be on a slight angle away from the centre of the loom. Do not drill too deep - these are only starter holes!
Once the starter holes are drilled you can begin lightly tapping the nails into the board with a hammer. The nails should stick up out of the board about 19mm or ¾ of an inch.
Putting the Loom Together
Join the side pieces together by inserting a bolt in each end of one of the side pieces, if you angled the nails they should tip out towards the head of the bolt. Then you place the spacer(s) on the bolt and thread the bolt through the second side piece. Add a washer and the wing nut on the bolt and tighten.
Repeat at the other end of your loom. Congratulations you now know how to make your own knitting loom and you are all ready to go!
Couldn't Find What You Were Looking for?
Try searching the site using the search box below:


Recent Articles
-
Shetland Knitting and Shetland Knitters
Feb 07, 21 07:44 AM
Shetland knitting and the women in the Shetland Isle who create Shetland lace are among the best knitters in the world. -
Fixing Knitting Mistakes
Jan 28, 21 02:35 AM
When you are learning how to knit, you are going to make a few mistakes. It might not make you happy but fixing knitting mistakes is par for the course. -
Shetland Lace Knitting
Dec 11, 19 07:03 PM
Shetland Lace Knitting is a particular style of knitting that developed in the Shetland Islands and was one of the main exports of the Island early in the last century.
 >
>


